|
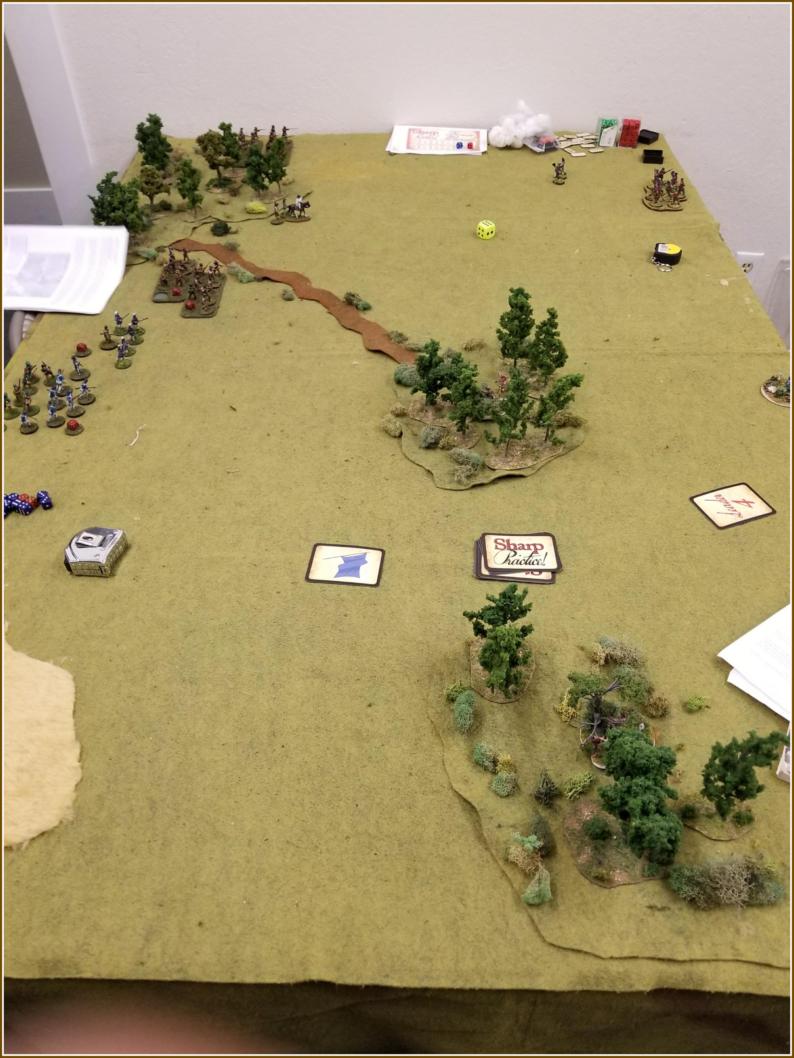
Below is an AAR (written by Will D.) of one of the
games played in our 1777 AWI Sharpe’s Practice campaign. This battle day (3
games) ended the current mission, our second, with the British side holding
off the American side as it tried to intimidate the local population. The
American side was only able gain 40% completion. Based on the results of the previous
two missions (both British success) I’ll be moving the campaign map down
towards Albany, New York for our third mission.
|
|
|
August 28th,
1777
Major Blaine orders scouting patrols out to both the
east and west in order to locate the rebels. He makes it clear to those on
patrol that in no way can the rebels get past this picket line unnoticed.
The major paces the camp in the late in the morning
hours on edge, as he yet has to find the rebels. As the morning fog clears
into the afternoon a runner arrives at the camp finally with news on the
rebels. It seems that the rebels are indeed moving north, the scout reports
their location and indicates they were not spotted. While the major pondered
an option to march parallel to the rebels in order to get ahead of them, he
is clearly tired of being subtle and decides to bring them to battle soon as
possible.
Though the column was ready to move out, it was going
to be late in the evening when they would intercept the rebel force as the
wooded terrain will impede there progress. So it is not until 7pm that the
leading scout patrols contact the rebel picket line and firing rings out as
they engage each other. The leading company holds up and the major sends the
other companies to the left and right straight into battle.
|
|
|
Dearest Lady
Chatterly,
Despite losing
some of Sgt. McUreigh’s rangers for picket duty [-6 figs], this afternoon, we met the enemy once
again and fared positively. Moving
through the woods to the far right of the centre company, we were led
northwards by Lisette, the half-Indian who has been a proven pathfinder, to a
clearing interspersed with thick stands of trees.
Lieutenant Moon
and Chief Ochataquin’s Hurons [2 groups plus bruiser] soon delved under the canopies to the right while Ensign Townshend
took his men [2 skirmisher groups] into
the trees in front. A line of rebel
militia, supported by a cannon and some riflemen appeared in short order
opposite us. I recognized their
mounted leader as the one we faced a previous day [Captain Hartwell].
|
 |
|
Our skirmishers
downed some of their gun crew [officer wounded, 10 Force Morale], who retaliated with a shot that sheared
branches and sent splinters across them.
The Hurons crept through the undergrowth, and Moon suffered a sprain
crossing a log [Bally, My Leg result].
|
|
 |
 |
|
Upon hearing the
cannon, I ordered my men [2 regular and 1 Provincial group] to lie low on the ground and then to
crawl in between the two stands of trees, and thus progress was slow [waited
to also use the secondary deployment point, but no Leader 1 card came up
until turn 5!] until our muskets were
within 80 rods of the cannon. With the
lieutenant trailing behind, the Huron chief led his warriors to the edge of
the woods and gave the Continentals a fusillade that was soon returned very quickly
by them at three rounds a minute!
|
|
 |
|
|
Townshend’s men
retreated into the woods to reload and emerged back out to re-engage the
cannon and rifles. A few more of their
men and ours dropped before the cannon turned to face my line, spouting fire. The ball whistled over us [about 4 shock],
we rose from crawling, and unleashed our first fire [20 shots] upon the rebels. This discouraged their line enough that
their Captain began to signal a withdrawal.
The remaining two
gunners understood and spirited their 3 pounder to safety, but the eight
regulars in front of the Hurons must have misheard and started to cautiously
approach the woods [At ‘em, boys! rolled a 3” movement].
Chief Ochataquin must have seen the opportunity and launched all of
his braves from the woods in a forward rush of flung tomahawks!
|
|
 |
 |
|
Townshend’s men
retreated into the woods to reload and emerged back out to re-engage the
cannon and rifles. A few more of their
men and ours dropped before the cannon turned to face my line, spouting fire. The ball whistled over us [about 4 shock],
we rose from crawling, and unleashed our first fire [20 shots] upon the rebels. This discouraged their line enough that
their Captain began to signal a withdrawal.
The remaining two
gunners understood and spirited their 3 pounder to safety, but the eight
regulars in front of the Hurons must have misheard and started to cautiously
approach the woods [At ‘em, boys! rolled a 3” movement].
Chief Ochataquin must have seen the opportunity and launched all of
his braves from the woods in a forward rush of flung tomahawks!
The savagery of
the assault threw the browncoats in disarray [after fisticuffs, Force
Morale down from 10 to 6 to the British FM of 10], but exposed Ochataquin to a violent volley from the line of blue
behind them, sending a couple braves reeling to the ground. I could not halt in time the vengeful
butchery that happened afterwards to the rebels left upon the field, as the
rest of them retired into the growing darkness with the worst of memories [Captain
Hartwell now hated enemy].
An Indian
medicine man accompanied me in place of Doctor Nixon who was up to his arms
in surgery at the Johannson house. The
elder quickly began tending to both Indian and English wounded with his
strange poultices and herbals, particularly the revered Lieutenant Moon. The other Indians did mourn their losses again
…and collected more ghastly trophies in return for scattering the enemy
off. I have grown to respect their
Chief, as his battle prowess and leadership with Lieutenant Moon has led to
our growing victories in this wilderness despite their band’s ever dwindling
numbers [bruiser pocket friend]. I
discern that there is a dangerous fever for revenge in him.
During our
Company officer council, he spoke forcefully of keeping a “white man’s war”
away from native villages. His words
reinforced my initial desire that our army move southward as planned to New
York rather than up the Mohawk River valley. We are getting closer to
succeeding in our endeavor to cut off New England from the rest of the
colonies. In due time, God willing,
this rebellion will capitulate.
Ever Yours,
Captain Reginald
Daltrey,
24th Regiment of
Foot
|
|
|
August 29th
Maj. Blaine is once again pleased with the performance
of his troops as they drive off the rebels; though not many dead there were a
lot of wounded in this exchange. Again with the darkness there is no
opportunity to immediately pursue the rebels.
The morning breaks with heavy fog that pretty much
insures there will be no pursuit. Instead Maj. Blaine orders the column to
march to Bennington so they can drop off there wounded and get back onto the
road. Familiar with the area they easily find Bennington in the thick fog by
late morning.
Once the fog lifts in the afternoon, Maj. Blaine get
the column in pursuit of the Rebels whom has vague reports are moving south
at a fast rate. He sends off a Patrol to check on the Sutter farmstead to the
southeast to see if it was burned down.
By evening there is no sign of the rebels and he
suspects they are fleeing to south. Once the patrol returns information them
that the farmstead was intact, he decides the Rebel incursion is over. He’ll
march of Pittsfield and see what damage was done in the morning however.
|
 |
Thursday, October 18, 2018
Woodlands Battle - AWI Campaign
Tuesday, October 2, 2018
Quick Hobby Project - 28mm Fir Trees
I was scrounging around some old boxes yesterday and found an open bag with a few fir trees in it. I recalled that when I was making up trees for our 15mm Napoleon's Battle games and I deemed around a dozen trees as being too "big" for use with 15mm miniatures. However, instead of throwing them away, I packed them away in a box and then promptly forgot about them ... for over a decade!
 I had sold off my NB figures several years ago and now almost exclusively paint/game with 28mm figures. So when I came across the forgotten trees I realized I now have a reason to get them on the gaming table. So taking a break from painting up some Dutch infantry for Sharp's Practice and a Dark Elf Blood Bowl team, I decided on a quick one day hobby project to base up the trees.
 The trees are wire stemmed so before use I would need to make some kind of base for them. I had thirteen trees (with one of them being a very small one that I must have missed those years ago) and at first was going to base them individually, but upon reflection decided to do a mix of one's and two's per base.
 I cut various shapes from card stock but realized that the card stock was to thin glue the trees to. In addition the stem of the tree was to short to twist into a flat shape to glue to the base. So I cut up thirteen squares of foam board to thicken up the location where each trees would "planted". Needless to say, the foamcard kind of stood out, so I puttied up the base to hide them.
 I then painted the base a reddish brown highlighted with a tan, glued on some dirt/rocks, as well as some flocking. The base was looking a little bare, so I added some clump foliage to "raise" the height of the flocking. I then drilled a small hole into the foam board and superglued in the tree ... for eight bases of "large" fir trees for use with my 28mm Chain of Command, Sharp's Practice, SAGA figures or even a Frostgrave games.


Thursday, June 14, 2018
Napoleonic Dutch Infantry Company
I have decided to get back to some basic's, aka Napoleonics, for Sharps Practice. I decided to just use the lists out of the book, so peninsula war it is. I was not as keen on doing up French at this point, but we needed some "enemies" for the British, Portuguese and Spanish players, so French it was ... well kind of.
I would create up the list using the French stats, but paint the figures up as French Allies from Level's "German" division. This division was comprised of infantry from Baden, Nassau, Dutch, Hessen-Darmstadt and the Confederation of the Rhine. After some consideration I settled on a company from the 2nd battalion, 4th Dutch Regiment.

Next I looked at the French list in SP2 and came up with this force as my starting point:
Capt. Reynst (Lvl III)
Sgt. Goossen (Lvl I)
"French" Line Infantry (8 figures)
"French" Line Infantry (8 figures)
"French" Grenadiers (8 figures)
"French" Voltigeurs Skirmishing (6 figures)
Lt. Houtman (Lvl II)
"French" Line Infantry (8 figures)
"French" Line Infantry (8 figures)
"French" Voltigeurs Skirmishing (6 figures)
Lt. Trocke (Lvl I)
"French" Lancers (8 figures) - from a Westphalian Chevau-léger Regiment
Finally I painted on the few details on each figure and let them dry overnight. The next day I washed the whole figure with some thinned down Army Painter soft tone and called them done. I may go back and touched up some of the details.
This was a simple paint scheme so I should be able to knock out the infantrymen in one fell swoop. So I am just waiting on the fifty plus figures to arrive ... then walla a SP force ready for actions sans the cavalry!

I would create up the list using the French stats, but paint the figures up as French Allies from Level's "German" division. This division was comprised of infantry from Baden, Nassau, Dutch, Hessen-Darmstadt and the Confederation of the Rhine. After some consideration I settled on a company from the 2nd battalion, 4th Dutch Regiment.
Next I looked at the French list in SP2 and came up with this force as my starting point:
Capt. Reynst (Lvl III)
Sgt. Goossen (Lvl I)
"French" Line Infantry (8 figures)
"French" Line Infantry (8 figures)
"French" Grenadiers (8 figures)
"French" Voltigeurs Skirmishing (6 figures)
Lt. Houtman (Lvl II)
"French" Line Infantry (8 figures)
"French" Line Infantry (8 figures)
"French" Voltigeurs Skirmishing (6 figures)
Lt. Trocke (Lvl I)
"French" Lancers (8 figures) - from a Westphalian Chevau-léger Regiment
An interesting feature of the dutch uniform is that while it is basically a French uniform, the plume/tuft was on the side of the shako, instead of the front. I could not find a manufacturer who does a 28mm Dutch infantry figure. So I was left with using a proxy figure or relocating the plume/tuft of a French figure. I went the proxy direction and am using Elite Miniatures early French Legere figures which have side plumes on the shako.
The main "problem" with these figures is that they all have plumes. Which means they will work very well for the Grenadiers and Voltigeurs (I'll just square off the cuffs when painting them up). But I'm not sure if it is worth (or easy enough) to cut down the plume to a tuft for the Line infantry. Either way I am going to use the Elite figures, so I went ahead and ordered them now, as my main supplier does not keep stock of the early french and would have to order them from the UK.
He was able to send out the command pack that I am going to use for some leaders. So I decided to paint them up as the "test" figures. As the Dutch had white uniforms, I went with a grey primer then a highlight of white primer from above. Then used my large brush and applied an overbrush of white to each figure.
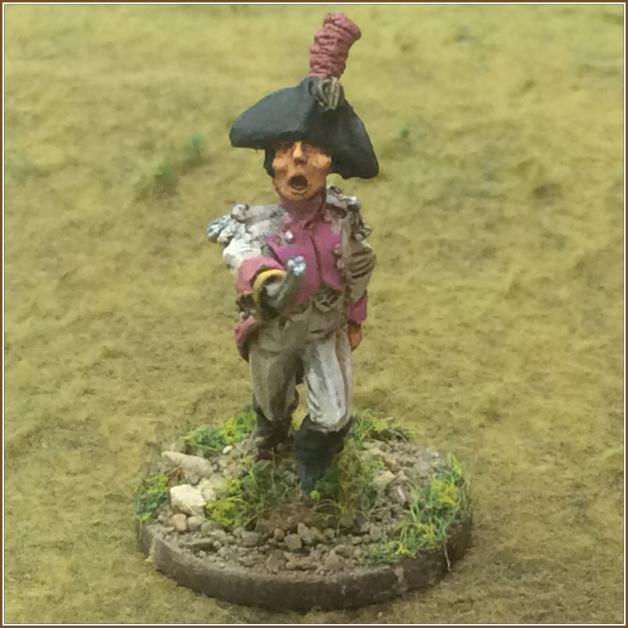 |
| Capt. Reynst leading his fifty plus men through the perilous combat on the Iberian peninsula. |
The 4th Regiment had rose/pink facings (2nd Regiment was blue), which I next applied to the collar, cuffs, turnbacks as well as all the plumes (tufts). Next was two and half tones of flesh, followed by the boots, scabbards and shako in black (well really dark grey).
 |
| Sgt. Goossen, the Captains right hand man. He is a standard bearer normally, but I am thinking of adding a halbeard instead |
 |
| Lt. Houtman ... with his broken sword! The sword was broken in the package. I tried glueing the other piece to the end, but the first stress on it and it popped off. I am thinking now if I can get a right handed pistol "hand" I could chop the hand off and attach a new hand w/ pistol. |
I used my normal basing steps, but I think the basing turned out a little to "green" for Spain, so I am thinking of yellowing up the grass/bushes somewhat. Though as the games will be played on green table cloths not going to lighten it to much.
 |
| Right now I don't have a drummer in my force but if I decide to add one, he is already to go. Hard to see but the drum rim is in the red, white blue of the dutch. |
This was a simple paint scheme so I should be able to knock out the infantrymen in one fell swoop. So I am just waiting on the fifty plus figures to arrive ... then walla a SP force ready for actions sans the cavalry!

Thursday, May 3, 2018
Hasty Breastworks for American Civil War
I have not put on a ACW Fire & Fury game in a long time and thought this month would be a good time to correct that. I have been gaming F&F since the early '90s and it sometimes feels like I have gamed every conceivable ACW battle imaginable! While I have participated in several games of Antietam using the original Fire & Fury rules, I realized I had not gamed this battle at all with my current gaming group ... in the last 20 years!
And as I have not gamed the battle using the Regimental level rules, it was an easy call to pull out my copy of Civil War Battle Scenarios Vol 1 for Regimental Fire & Fury to run the Cornfield scenario later this month. When looking over the terrain notes, I noticed that both the Walker and Douglass confederate brigades start the game behind some hasty breastworks made out of piled up fence rail. As all my 15mm fieldworks are geared for WW2, I thought I'd go about making a couple of feet of fields works for 1860's.
After reading about the battle, it seems that the breastworks were just piled up sections of fence rail ... so I thought it would be easy to also just pile up some toothpicks and pour glue over them to hold them together. While it would be more "realistic" I did not like the look of it. In addition I was going to have to either do layers of fence or make a jig to build up the height of the breastworks. So after viewing some actual pictures and reading several other blogs about it, I decided on making them a little less "hasty".

I collected up the materials, 6" popsicle sticks, toothpicks, putty, a few rocks, paint, knife, glue and water. Then found a suitable "work space" (a priority mail box) and started the build.

I realized early on that the 6" sticks were going to warp, so I ended up cutting each in half (3" sections.) I actually think the smaller sections will work better in the game as well.

I first mixed some putty, paint and water into a cup and spread the dark brown paste to each popsicle stick. Then cut a little section of toothpick and placed them upright along the centerline of each popsicle stick to use as a barrier for the piled fence rails. I planned on "piling" up the toothpicks on the half closest to the unit, with the other half flocked to blend with the table.

For the pile of fence rails I used toothpicks and cut each end down to even them up. Then I just started gluing them down to the paste, then atop each other. I broke a few and laid them at angles to the rest and used some rocks to fill in larger gaps. I was in a hurry and some of them turned up a little short, but in the end they will all work just fine on the gaming table. I let this dry overnight as it was getting late at the store.
The next day I painted on a mix of water, glue and lighter brown paint to the rocks and fence rails. This was to both prime them for painting but also add more strength to the piles of fence rails.

Once they were dry the next step was to paint the rail fences. I ended up using three colors, Terracotta Beige, Khaki Tan and Light Buttermilk. Not much thought went into the colors, I just grabbed two lighter brown colors and a "white" from my box of craft paints.

I painted each section using a slightly modified overbrush/wet blend process. I first applied a heavy coat of Terracotta Beige over about 80% of the fence rails, then I dry brushed a thick coat of the Khaki Tan onto it to lighten them up. I mixed some Light Buttermilk into the Tan and lightly dry brushed the fence rails, trying to pick out the edges and ends. I also dry brushed the earth as well.

Finally I added a some small stones and light grass color flock. As this was drying I glued down small clumps from my clump foliage remnants container to give each of them a green "look". In reality, with all the feet trampling the ground as they built up the breastworks, the area around it would be mostly dirt/mud. That however looks too stark on the gaming table, so green foliage to the breastworks it is!

Considering I did three feet of breastworks in less than two days work, they turned out pretty good. The only thing I would/will do differently is just make sure that all the works are waist high, a couple of them are pretty low.
I am thinking I'll next airbrush the map onto a green cloth next week. We won't have enough fence for the battle but airbrushing in all the roads, fields and woods will help divide the battle field up. And time permitting I might look at turning some astro turf into cornfields...
And as I have not gamed the battle using the Regimental level rules, it was an easy call to pull out my copy of Civil War Battle Scenarios Vol 1 for Regimental Fire & Fury to run the Cornfield scenario later this month. When looking over the terrain notes, I noticed that both the Walker and Douglass confederate brigades start the game behind some hasty breastworks made out of piled up fence rail. As all my 15mm fieldworks are geared for WW2, I thought I'd go about making a couple of feet of fields works for 1860's.
After reading about the battle, it seems that the breastworks were just piled up sections of fence rail ... so I thought it would be easy to also just pile up some toothpicks and pour glue over them to hold them together. While it would be more "realistic" I did not like the look of it. In addition I was going to have to either do layers of fence or make a jig to build up the height of the breastworks. So after viewing some actual pictures and reading several other blogs about it, I decided on making them a little less "hasty".

I collected up the materials, 6" popsicle sticks, toothpicks, putty, a few rocks, paint, knife, glue and water. Then found a suitable "work space" (a priority mail box) and started the build.

I realized early on that the 6" sticks were going to warp, so I ended up cutting each in half (3" sections.) I actually think the smaller sections will work better in the game as well.

I first mixed some putty, paint and water into a cup and spread the dark brown paste to each popsicle stick. Then cut a little section of toothpick and placed them upright along the centerline of each popsicle stick to use as a barrier for the piled fence rails. I planned on "piling" up the toothpicks on the half closest to the unit, with the other half flocked to blend with the table.

For the pile of fence rails I used toothpicks and cut each end down to even them up. Then I just started gluing them down to the paste, then atop each other. I broke a few and laid them at angles to the rest and used some rocks to fill in larger gaps. I was in a hurry and some of them turned up a little short, but in the end they will all work just fine on the gaming table. I let this dry overnight as it was getting late at the store.
The next day I painted on a mix of water, glue and lighter brown paint to the rocks and fence rails. This was to both prime them for painting but also add more strength to the piles of fence rails.


I painted each section using a slightly modified overbrush/wet blend process. I first applied a heavy coat of Terracotta Beige over about 80% of the fence rails, then I dry brushed a thick coat of the Khaki Tan onto it to lighten them up. I mixed some Light Buttermilk into the Tan and lightly dry brushed the fence rails, trying to pick out the edges and ends. I also dry brushed the earth as well.

Finally I added a some small stones and light grass color flock. As this was drying I glued down small clumps from my clump foliage remnants container to give each of them a green "look". In reality, with all the feet trampling the ground as they built up the breastworks, the area around it would be mostly dirt/mud. That however looks too stark on the gaming table, so green foliage to the breastworks it is!

Considering I did three feet of breastworks in less than two days work, they turned out pretty good. The only thing I would/will do differently is just make sure that all the works are waist high, a couple of them are pretty low.
I am thinking I'll next airbrush the map onto a green cloth next week. We won't have enough fence for the battle but airbrushing in all the roads, fields and woods will help divide the battle field up. And time permitting I might look at turning some astro turf into cornfields...
Thursday, March 29, 2018
Jump-Off Points for CoC
We've been playing more and more of the Chain of Command rules by Too Fat Lardies at the store of late. And one of the really cool parts of the game, is the Patrol phase that starts each game. It is a quick mini-game to see where your Jump-Off Points are located, and these in turn are where you can deploy your troops from. As the JoP's were going to be on the table, I thought it was about time I started making some diorama JoP's bases instead of the wooden discs we've been using.
As the patrol markers will only be on the table for a short time, I just found some images online, printed them out and glued them to a thin 50mm circular base. Once a patrol marker moves to within 12" of an enemy marker, you flip the marker over to locked both of them into place.

Once all of ONE sides markers are locked, the Patrol phase ends and the Jump-Off Points need to be placed. Basically you use one of your patrol markers and the two closest enemy markers to find an area that a JoP can be placed in, which must be in or behind cover.
 I am using 60mm bases for JoP's and since they are going to stay on the table, thought it would look best to turn each of them into a mini diorama.
The first couple of ones I did, I used a barrel and fuel can resin piece from Micro Art Studios.
I painted them up in varies shades of green and olive drab. Rusted them with dabs of red-brown with a piece sponge and the washed them in a couple of shades of brown, green and black.
 The result was some pretty used and beat up barrels. This was compounded when I based the pieces and washed the area around them with the same colors plus some yellowish orange wash!
They turned out very well ... for a toxic spill site :) I am still going to use them in our games, especially when tanks are present. But will only use one per side and they will most likely be the JoP closest to the table edge.
So it was back to the drawing board for the next JoP's. I fished out a miniature that a friend of mine had painted up (hoping it was not one that Steve needed!) and started thinking of ways to use him on a base. My first thought was to have him behind a hedge, but when fiddling around with the miniature on a base I realized that it was going to be too "plain".
 So I shrunk down the hedge to a large bush, but I thought a sign post would look good next to it, so I drilled out a small hole in the base for it. I of course then realized I would need to place the signpost next to a road, so I marked off some of the base to be the edge of a road.
I glued down the figure and did my normal basing steps on most of the base, though leaving the road bare. I normally don't use spackle on bases, but wanted the road to be different from my regular basing steps, so put a small layer of spackle on the area marked off and gouged it with a hobby knife for a "road effect".
 I then glued down a large chunk of clump foliage and soaked it with water downed glue to stiffen it up. The sign post was quickly made from some scrap material I had lying around and painted in white, added the St. Lo and then glued it to the base. Next was some weathering of the road and sign post, as well as touching up the figure. The figure needed to brighten and touched up. I then called this JoP finished!
I'll do up another two for the Germans, then mimic them and do a set of three for the British. I ordered some small farm animals and have an idea about adding a pig or chicken to one of the bases. Still looking for more ideas, but am thinking using some of my "hated" prone figures.
Hopefully will get some of the British ones done quickly as we want to start up one of the mini campaigns (Martlet) and will post those JoP's as they are finished.
As the patrol markers will only be on the table for a short time, I just found some images online, printed them out and glued them to a thin 50mm circular base. Once a patrol marker moves to within 12" of an enemy marker, you flip the marker over to locked both of them into place.

Once all of ONE sides markers are locked, the Patrol phase ends and the Jump-Off Points need to be placed. Basically you use one of your patrol markers and the two closest enemy markers to find an area that a JoP can be placed in, which must be in or behind cover.
 I am using 60mm bases for JoP's and since they are going to stay on the table, thought it would look best to turn each of them into a mini diorama.
The first couple of ones I did, I used a barrel and fuel can resin piece from Micro Art Studios.
I painted them up in varies shades of green and olive drab. Rusted them with dabs of red-brown with a piece sponge and the washed them in a couple of shades of brown, green and black.

They turned out very well ... for a toxic spill site :) I am still going to use them in our games, especially when tanks are present. But will only use one per side and they will most likely be the JoP closest to the table edge.
So it was back to the drawing board for the next JoP's. I fished out a miniature that a friend of mine had painted up (hoping it was not one that Steve needed!) and started thinking of ways to use him on a base. My first thought was to have him behind a hedge, but when fiddling around with the miniature on a base I realized that it was going to be too "plain".

I glued down the figure and did my normal basing steps on most of the base, though leaving the road bare. I normally don't use spackle on bases, but wanted the road to be different from my regular basing steps, so put a small layer of spackle on the area marked off and gouged it with a hobby knife for a "road effect".
 I then glued down a large chunk of clump foliage and soaked it with water downed glue to stiffen it up. The sign post was quickly made from some scrap material I had lying around and painted in white, added the St. Lo and then glued it to the base. Next was some weathering of the road and sign post, as well as touching up the figure. The figure needed to brighten and touched up. I then called this JoP finished!
I'll do up another two for the Germans, then mimic them and do a set of three for the British. I ordered some small farm animals and have an idea about adding a pig or chicken to one of the bases. Still looking for more ideas, but am thinking using some of my "hated" prone figures.
Hopefully will get some of the British ones done quickly as we want to start up one of the mini campaigns (Martlet) and will post those JoP's as they are finished.
Wednesday, March 28, 2018
39th New York Regiment "Garibaldi Guard"
So I have been in a little bit of a painting slump since finishing the two battalions of Russian Infantry in greatcoats. I have also been itching to get back into ACW, so thought I kill two birds with one stone, finishing up some long overdue painting projects (the 39th and Union Cavalry) and creating an excuse to get in a game of Fire & Fury.
First up was the 39th NY, known as the Garibaldi Guard or Lincoln's Foreign Legion. To be honest I don't know much about the unit, I am mostly Scottish, not Italian :) I mainly wanted a unit that looks different than the dozens of other Union regiments I already have!

 The regiment was not only composed of Italians, but included German, Hungarian, Swiss, French, Spanish, and Portuguese immigrants as well. The regiment was organized in New York City under Colonel Frederick George D’Utassy and mustered into service for three years on June 6, 1861.
Besides numerous skirmishes, the regiment fought at the following battles: 1st Bull Run (1861), Battle of Cross Keys (1862), Battle of Gettysburg (1863), Battle of the Wilderness (1864), Battle of Spottsylvania (1864), and the Appomattox Campaign (1865).
During its period of service, 5 officers and 62 enlisted men were killed in action; 3 officers and 49 enlisted men died of wounds received in action; 1 officer and 158 enlisted men died of disease and other causes. In total, 278 men (9 officers and 269 enlistees) died while in service in the regiment. Of those, 1 officer and 99 enlisted men died while captured by the Rebel army.

Next is to finish the twenty stands of union cavalry that are now on the painting table.
Monday, March 26, 2018
Battle of Strausbach Farm - SP2 Campaign game
Note: the below After Action Report was written by Wil D, and was one of six games (#3 to be precise) that made up the second battle in our Sharps Practice 2 campaign.

August 12, 1777
Strausbach Farm near Hoosick, New York
Dearest Lady Chatterly,
We spent brief time recovering from the previous skirmish
before ordered by Major Potter to resume column and retaliate before the enemy
finds our main body. My Company was in the centre of march when the sound of
musketry came upon our left a few hours down the trail. A runner gave word to the Major, and we
debarked from the trail into the woodlands to find them.
 The Indians guiding us through the forest, I learned from
Lieutenant Moon, were actually of the Huron Nation, larger in build and of
fiercer countenance than the Mission Mohegans. They had travelled the furthest
and had departed from Fort Stanwick and St. Legere’s command after sorely
losing much of their personal effects in a sally by those besieged. Enraged,
Moon explained that, they seek to recover their “honor” (in the savage’s sense
of the word) by plunder and destruction. One among their number is rumored to
receive Burgoyne’s pardon a few days ago after the unfortunate Jane McRae
affair, but the Lieutenant would not candidly reveal which. I can only hope to
civilly temper their lust for retribution against any further loyalist families
we encounter, with the help of the Indian Department’s agents and Moon. At this
time, though, they have performed very reservedly upon the battlefield, perhaps
waiting opportunistically for a lone homestead rather than a militia firing
line. I am hoping to receive some local loyalists from Peter’s Corps to keep
them escorted during scouting duties in the future.
The Indians guiding us through the forest, I learned from
Lieutenant Moon, were actually of the Huron Nation, larger in build and of
fiercer countenance than the Mission Mohegans. They had travelled the furthest
and had departed from Fort Stanwick and St. Legere’s command after sorely
losing much of their personal effects in a sally by those besieged. Enraged,
Moon explained that, they seek to recover their “honor” (in the savage’s sense
of the word) by plunder and destruction. One among their number is rumored to
receive Burgoyne’s pardon a few days ago after the unfortunate Jane McRae
affair, but the Lieutenant would not candidly reveal which. I can only hope to
civilly temper their lust for retribution against any further loyalist families
we encounter, with the help of the Indian Department’s agents and Moon. At this
time, though, they have performed very reservedly upon the battlefield, perhaps
waiting opportunistically for a lone homestead rather than a militia firing
line. I am hoping to receive some local loyalists from Peter’s Corps to keep
them escorted during scouting duties in the future. As for the band of Highlander's with me, I sobered them
up after a fierce lecture about fire discipline and command calls after this
last fiasco. I entrusted them to Ensign Townsend and the forward Skirmishers (1
group plus 1 provincial militia) who, this time, fired first as the remainder
of my Company (2 regulars plus 1 skirmishes) approached between two copses of
trees.
As for the band of Highlander's with me, I sobered them
up after a fierce lecture about fire discipline and command calls after this
last fiasco. I entrusted them to Ensign Townsend and the forward Skirmishers (1
group plus 1 provincial militia) who, this time, fired first as the remainder
of my Company (2 regulars plus 1 skirmishes) approached between two copses of
trees.
What we beheld was a strong line of numerous Militia (4
groups) emerging from tall grass, with their frontiersmen running on either
wing towards the same trees holding my hidden Indian party and skirmishers. My
own front men moved into the right trees so that my line would have a field of
fire, while the rebel rifles started to seek targets among the left trees.
(Turns 3-4) Not yet within musket’s reach, I could see that my sixteen could
not withstand a face-off with the militia line.

As would have it, my left skirmishers worried by the
rifles, saw seven in hunting shirts charge them brandishing hatchets. They
hastily fell back into the interior (evade), but the militia sergeant fiercely
harangued his six to catch them at their backs (step out, lads) that all,
except one who bolted back to us, went deep to ground in the thickets for the
remainder (-1 FM, but casualties recovered). The steady hand of Townshend kept
the Highlanders nearby from also running. But where were Moon’s Hurons?
I could not stand to see my men in the woods overrun, so
I faced my line towards the brash rebel scouts instead of the militia and
loosed our first fire. This was enough to kill or send them packing back to
their lines, brave as they were. (Turn 5, -2 FM). As my skirmishers and
Highlanders continued to exchange with their riflemen, their second group of
scouts neared the right woods in front of my other skirmishers. That is when
Moon’s Indians finally revealed themselves.

Not wanting to expose themselves to the formidable line of
militia, they ambuscaded instead to the rear of the trees and threw musketry at
the scouts on the right in the open (2 x 12 shots) starting their eventual
withdrawal as well (another -2 FM over next two turns). But the militia of 40
muskets continued its inexorable advance and I thought it better to also take
my line, in columns of twos, into the woods to the right for protection. From
there, we relieved Sergeant Entwhistle's front men, whom I rallied to return to
the fight alongside our line, now fighting for their lives behind trunk and
branch. The good Doctor Nixon also restored Entwhistle enough so that he could
send his soldiers into defilade in an adjacent creek bed, though filled with
muck.
Meanwhile on the left flank, the militia and Indian party
had wisely also pulled back among their trees to avoid a devastating volley,
only exposing themselves enough for a stray shot to the far end of the militia
line. As the rebel scouts and riflemen retired, so too did the whole grand
division of militia through the grass, leaving us shaken, but maintaining the
field. (Final FM 7 vs. 4?). We fought more like them, quickly taking to tree,
while they fought more like us.

Under Grenadier Sergeant Entwhistle who needed further
treatment of his wounds and return to his home unit, I packed the Highlanders
to the rear back to McClewlis with a missive that “they all earned their farm,
rather than burial, plots,” and thanked Lieutenant Moon for his handling of the
natives, even as they scoured the battlefield for trophies I dare not mention. We
had suffered seven injuries and, surprisingly, no losses with what we had
faced. Reports from the rest of the column were also good. A detachment of the
Queen's Loyal Rangers, led by a Sergeant Frederic McUriegh, joined my command
to bolster our ranks, depleted from many hard months of campaigning. My desire
is that these Provincials will help recruit more locals to our just cause, or
at least police any excesses that the Hurons are want to commit. I survive
another day for the Crown, and for you.
Yours Dearest,
Lieutenant Reginald Daltrey
Thursday, March 1, 2018
Battle of Hanau 1813 - After Action Report
Last Saturday, Ralph Holoway put on a game of 4th edition Napoleon's Battle at the store. He took several pictures of the game and wrote up a report on how it went. I have re-posted his AAR with his permision below.
 The initial deployments were based off of historical deployments, the Bavarians (Ronald and Daine Oldman) to the north of the Kinzig, with their cavalry and the Raiding Force of Austrian and Cossack cavalry on the far left, and the Austrian corps and cavalry south of the Kinzig Stream.
 The French (Jeroen Koopman and Gary Smith) were deployed in the Puppenwald and Lamboi woods initially shielded from Bavarian and Austrian artillery and musket fire.
The action started slowly in Turn 3 with the French infantry moving forward on their right in the Puppenwald and the 2nd Guard Cavalry moving out of the Puppenwald to the open terrain on the French right. The Bavarians began to engage the French in the Puppenwald with their artillery.

The Austrian commander then chose to begin the move of two brigades of his cavalry to the left flank to aid the Bavarian cavalry and the French received the 2nd Light Cavalry Division in the Puppenwald.
As the cavalry battle was joined between the Bavarian light cavalry and the Raiding Force, and the 2nd Guard Cavalry, this seemed less necessary. The allied cavalry soundly repulsed the Guard Cavalry (three consecutive rolls of 1 by the French).

On Turn 3 the French received he 4th light Cavalry Division deploying out of the Puppenwald to aid the French cavalry on the right.

The French infantry on the left flank in the Puppenwald moved to engage and combat the Bavarian left flank infantry vicinity Neuhof Farm on Turn 4. The Bavarians abandoned their guns during the onslaught.
Meanwhile on the French left in the Lamboi Woods, the French infantry had moved forward to engage the Bavarians south of Neuhof Farm. They were fired upon by some Austrian artillery south of the Kinzig Stream as well.

Between 12:30 hrs. and 1330 hrs. the 1st Old Guard Division, the 2nd Old Guard Division and Guard Artillery arrive arrived via road in the Lamboi Woods. The Guard moved forward to engage and combat the Bavarians and Austrians south of the Neuhof Farm.
On the French right, the cavalry battle continues with mixed results for the French. The Bavarian light cavalry is forced to withdraw, but Austrian cavalry arrived to reinforce the flank.
The game ended on Turn 8 or 13:30 hrs. after approximately five hours of play.
Conclusions I drew from the play of the scenario as written:
- Need to start battle later,11:00 hrs. versus 9:00 hrs. This will start that fight earlier in game play and give the French cavalry on the right two more light cavalry divisions for the cavalry fight on the right.
- Also, would probably preclude Austrian cavalry from south of Kinzig Stream affecting that fight. This is more historical in outcome, as the French cavalry threatened the Bavarian infantry after their defeat of the allied cavalry. Also, this would bring the main fight of the Old Guard to clear the north of the Kinzig Stream earlier in play.
- Need to give more depth to the French deployment area in the woods for Imperial Guard deployment.

The French (Jeroen Koopman and Gary Smith) were deployed in the Puppenwald and Lamboi woods initially shielded from Bavarian and Austrian artillery and musket fire.The action started slowly in Turn 3 with the French infantry moving forward on their right in the Puppenwald and the 2nd Guard Cavalry moving out of the Puppenwald to the open terrain on the French right. The Bavarians began to engage the French in the Puppenwald with their artillery.
The Austrian commander then chose to begin the move of two brigades of his cavalry to the left flank to aid the Bavarian cavalry and the French received the 2nd Light Cavalry Division in the Puppenwald.
As the cavalry battle was joined between the Bavarian light cavalry and the Raiding Force, and the 2nd Guard Cavalry, this seemed less necessary. The allied cavalry soundly repulsed the Guard Cavalry (three consecutive rolls of 1 by the French).
On Turn 3 the French received he 4th light Cavalry Division deploying out of the Puppenwald to aid the French cavalry on the right.
The French infantry on the left flank in the Puppenwald moved to engage and combat the Bavarian left flank infantry vicinity Neuhof Farm on Turn 4. The Bavarians abandoned their guns during the onslaught.
Meanwhile on the French left in the Lamboi Woods, the French infantry had moved forward to engage the Bavarians south of Neuhof Farm. They were fired upon by some Austrian artillery south of the Kinzig Stream as well.
Between 12:30 hrs. and 1330 hrs. the 1st Old Guard Division, the 2nd Old Guard Division and Guard Artillery arrive arrived via road in the Lamboi Woods. The Guard moved forward to engage and combat the Bavarians and Austrians south of the Neuhof Farm.
On the French right, the cavalry battle continues with mixed results for the French. The Bavarian light cavalry is forced to withdraw, but Austrian cavalry arrived to reinforce the flank.
The game ended on Turn 8 or 13:30 hrs. after approximately five hours of play.
Conclusions I drew from the play of the scenario as written:
- Need to start battle later,11:00 hrs. versus 9:00 hrs. This will start that fight earlier in game play and give the French cavalry on the right two more light cavalry divisions for the cavalry fight on the right.
- Also, would probably preclude Austrian cavalry from south of Kinzig Stream affecting that fight. This is more historical in outcome, as the French cavalry threatened the Bavarian infantry after their defeat of the allied cavalry. Also, this would bring the main fight of the Old Guard to clear the north of the Kinzig Stream earlier in play.
- Need to give more depth to the French deployment area in the woods for Imperial Guard deployment.
Wednesday, February 14, 2018
The Neilson House - Saratoga NY 1777
As we have been gaming a lot of Sharp's Practice games of late, I thought I would make a building to use for our future games. I first did a minimal search for "1777" structures and found a pic of a red cabin at the Saratoga National Park, the Neilson House. I liked the design of the house, but was not so sure about the color of it, very red! But alas that seems to be historically accurate and who am I to buck history :)

 I sketched out the design on some graph paper using a perry figure for scale ... while I admit it is a little larger than I anticipated, it is not nearly as "large" as these pictures make it out to be; must be the angle of the camera phone. Out came the foam board, balsa wood, rulers and cutting blades.
 Most of this was simple measure and cut, but the "cut out" section proved a little harder to do than I thought it was going to be. Fortunately, I had plenty of extra scrapes to fix any of the walls that came up short. I also wanted the roof to come off but had not had much success with my previous buildings. So on this build I tried out a "new" reinforced technique which worked well and I kind of feel dumb not doing this on most of my other buildings. I just cut out foam board and stuck the roof tiles on to it, instead of two end pieces and running the roof tiles across ... doh!

 The slat planking for the sides were pretty tedious to do, but do look really good. I cut lots of strips of thin cardboard (such as cereal boxes) then glued then onto each other to form each side of the building. Unfortunately I did not actually have a cereal box and started to run out as the box I used was pretty small! So I ended up combining several shorter pieces to finish every side. That said, I actually really like the look of this, as no two boards are actually the same. IMO this gives a much more realistic look than the "perfect" laser cut mdf buildings.
 For the windows I started out like I normally do, gluing cut strips of balsa wood to a piece of graph paper to line them up, then glue it the side of the building (and spackle around it) ... in this case I had to cut out a section of the plank siding to get in order to fit in the window. This was not working out very well, so I decided to measure and cut the windows on the siding first, then glue the siding to the wall, and then use the cut out to "measure" the balsa wood pieces for the frame to fit inside for each window. I really should go back and add in shutters but was getting anxious to finish, so skipped them. I can always add them in at a later date anyways.
 I wanted to roof to look different than the siding so made the "tiles" a little longer. Then I took a pen and drew in the "individual" tiles. Cut up the bottom of and generally scuffed each layer before gluing it down. I also paid special attention to the front porch overhang and the removable roof, as I wanted to have fairly seamless line when the roof is on. I was mostly done with the roof, when I realized I had not put on the chimney! So I just added a couple of layers of foam board and glued it straight onto the roof tile ... by far the worst looking chimney I have done and plan to redo it in the near future.

Now onto painting ... first up I wanted to try and "stiffen" up the building, so as seen on Youtube, I mixed some Mod Podge, brown paint and water; then painted the mix onto the building as a primer, as well as stiffening the build. This worked pretty well, though I need to get better at mixing the concoction, as the colored "primer" was really thin.
I next broke out the Iwata airbrush and loaded it up with some Vallejo Fire Red to paint the sides of the building. I then added some a sand color to the red and airbrushed some faded areas on it. To my surprise the red actually turned out pretty good! I next used a grey blue and sprayed the roof, but used a large brush to dry brush the edges and picking out individual tiles. I also painted the windows and the porch, though the worn wood look I was going for, did not come out like I wanted. To "fix" it, I applied some wash to it ... and was still not happy with it, so may line each plank to make them standout a little better.

For the most part I am calling this house done, it is very game usable right now and I can get to the other little things at any time. I have come across some close up views of the house and now realize that it sits atop a layer of stone ... sigh :) When I am really feeling like it, I will cut out a thin base of blue board and outline a stone base for it. Because of this I am not going to base the building right now and just use it without a floor.


 I sketched out the design on some graph paper using a perry figure for scale ... while I admit it is a little larger than I anticipated, it is not nearly as "large" as these pictures make it out to be; must be the angle of the camera phone. Out came the foam board, balsa wood, rulers and cutting blades.
 Most of this was simple measure and cut, but the "cut out" section proved a little harder to do than I thought it was going to be. Fortunately, I had plenty of extra scrapes to fix any of the walls that came up short. I also wanted the roof to come off but had not had much success with my previous buildings. So on this build I tried out a "new" reinforced technique which worked well and I kind of feel dumb not doing this on most of my other buildings. I just cut out foam board and stuck the roof tiles on to it, instead of two end pieces and running the roof tiles across ... doh!
 The slat planking for the sides were pretty tedious to do, but do look really good. I cut lots of strips of thin cardboard (such as cereal boxes) then glued then onto each other to form each side of the building. Unfortunately I did not actually have a cereal box and started to run out as the box I used was pretty small! So I ended up combining several shorter pieces to finish every side. That said, I actually really like the look of this, as no two boards are actually the same. IMO this gives a much more realistic look than the "perfect" laser cut mdf buildings.


Now onto painting ... first up I wanted to try and "stiffen" up the building, so as seen on Youtube, I mixed some Mod Podge, brown paint and water; then painted the mix onto the building as a primer, as well as stiffening the build. This worked pretty well, though I need to get better at mixing the concoction, as the colored "primer" was really thin.
I next broke out the Iwata airbrush and loaded it up with some Vallejo Fire Red to paint the sides of the building. I then added some a sand color to the red and airbrushed some faded areas on it. To my surprise the red actually turned out pretty good! I next used a grey blue and sprayed the roof, but used a large brush to dry brush the edges and picking out individual tiles. I also painted the windows and the porch, though the worn wood look I was going for, did not come out like I wanted. To "fix" it, I applied some wash to it ... and was still not happy with it, so may line each plank to make them standout a little better.

For the most part I am calling this house done, it is very game usable right now and I can get to the other little things at any time. I have come across some close up views of the house and now realize that it sits atop a layer of stone ... sigh :) When I am really feeling like it, I will cut out a thin base of blue board and outline a stone base for it. Because of this I am not going to base the building right now and just use it without a floor.

Subscribe to:
Posts (Atom)