Tuesday, February 23, 2016

Ghar Battleforce

Had a few left over models from the release of the Beyond the Gates of Antares last year. In addition, I traded the set of Concord figures which came with the set for more Ghar battlesuits. They had been sitting in a box since then, so thought I would break out the airbrush to quickly paint up the figures.

I was not keen on the light grey or white theme shown throughout the book ... it seems just to "Hi Tech" for the Ghar, so went with a green and brown theme.

Meet my "Little Friends" - Ghar Outcast Commander with twelve battlesuits

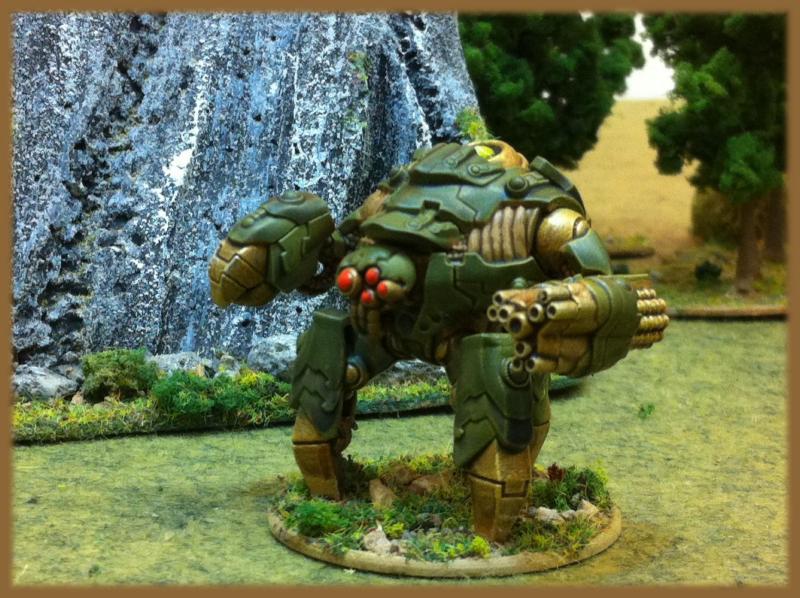
Standard Ghar Battlesuit - main weapon is the Scourer Cannon

Ghar Assault Suit - the Gouger gun pins the enemy. Then they move in and finish them with the Plasma Claw.
The limited edition BtGA had a special character figure, Fartok leader of the Outcast Revolt. Not sure if I'll get around to painting up any more Ghar, but if I do, I have a pretty cool figure for a command squad. It seems that if a Ghar screws up (and survives), it has its suit taken away and is referred to as an Outcast aka penal battalion. It would appear that not all Ghar appreciate the one strike rule :)
Fartok without its Battlesuit -
 I thought the red "eyes" really help make the figure stand out. Initially was going to go with "glowing" yellow, but thought a sharp contrast would work better.


I have already done up a couple of squads for the Algoryn and Boromite factions; now the Ghar. I should probably just stick to one faction and complete it!

Tuesday, February 2, 2016

Honours of War in 15mm

Even though I had already participated in three games this week, I met up with several friends at the store on a Sunday (my one day off) to get another wargame in for the week. James had recently purchased the Honours of War rules by Osprey Publishing and was motivated to dig out his 15mm SYW figures for a game (he even rebased some of his miniatures!).

I had already dabbled with rules and they had been gamed at the store several times. I was not too impressed with them so far, it seemed to me that all you did was move up and then pull units off the table at the slightest wisp of combat. In addition the units seemed very bland, everything has the same stats, leaders were just tokens to measure command to/from et... But I always have a good time gaming with my friends, so made the best of it.

James went with a semi large game to begin with; each side had about 36 units (the Austro-Russian force had 34, but four large units). James and I played on the Austro-Russian side, while Chris and Steve commanded the Prussians. Most units were rated as per the book, though we did play the Russian artillery as Superior.

I commanded three brigades of infantry and one brigade of cavalry, all Russian. James, who was to my right, commanded the Russian grenadier brigade, two cavalry brigades and the Austrian infantry. The lone Austrian grenadier battalion was an independent unit.

Chris commanded two brigades of infantry and two brigades of cavalry. While to his left, Steve commanded two infantry brigades, a cavalry brigade and a large grenadier brigade.

After we had set up our forces, we then rolled for our commanders abilities ... which really created some interesting dilemma's for both sides. Chris for example had rolled two dithering commanders, while Steve on the other hand had two dashing commanders. James and I each had a dithering commander.

We spent about four turns maneuvering our forces against each other ... some of the delay was due in part to our poor maneuvering die rolls (the dithering commanders were especially living up to their lack of ability!)
Eventually we had some cavalry clashes. I learned that charging fresh infantry to the front was not really going to work out well for the cavalry ... even with Chris bad die rolling! But the battle raged on and my Russian infantry pressed into the Prussians, with limited success. The Prussian hammered back and almost broke my command.
Steve and James squared off and proceed to engage in long range fire while the cavalry on the flank battled for supremacy. It looked like the Russian cavalry was going to sweep away the remaining Prussian hussars, after they had beat up the Austrian Cuirassiers! Then there was a lull in the cavalry fight, at which time both sides Grenadiers came to grips and proceeded to blow each other away!

I was able to reform my line on the left flank, largely because the dithering brigade finally had moved up and formed battle line. Our center was dangerously absent of troops ... fortunately the Prussian's had nothing organized and ready to move into the gap.

We called the game shortly thereafter ... a draw favoring the Prussians. They had beat up the center, but did not have any troops to exploit it. I held the left with enough force and James still had the large Austrian infantry force, with much of it untouched on the right and soon would have a slight advantage in cavalry.
 
Wow ... I unexpectedly had a great time playing HoW! We played for over five hours and only stopped when we realized it was 6pm. I am not sure if it was the size of the game, the scale of the figures or even that I was the rules adjudicator, but this was far and above the best game of HoW I had participated in or seen played.
 
That said there were still a few things that detracted from the game. Several parts of the rules are unclear or vaguely written. I know that after I read the rules a couple more times I'll be able to piece together clarity for some of the questions. I just get tired of having to make an educated guess on what an author was poorly trying to get across (Edit: Most have been cleared up after a couple of thorough readings of the rules) ...
 
The main drawback to the game is that it is in centimeters. Besides being a pain to convert (none of the QRS have been converted), I found it difficult to get a feel for the ranges and movement of troops (I know I was not the only one!). Also as we we're using 15mm figures (all ranges in the book should have been halved), we ended up incorrectly using ranges in different sections of the rules. This will be alleviated once I do up a QRS in Imperial measurements and a few more play through of the rules.
 
Neither issue will stop us from gaming again and in fact James is already working on another game with even more troops!



Wednesday, January 20, 2016

Drumbeat 2016

So another Drumbeat is in the books … The turnout this year was good, 58 people showed which was up from the 55 of last year. There was a decent slate of games as well, with equal number of games for the 1st session and 2nd session.

I changed up my routine this year, in that I just went to game and did not host a game or really help out while there. Which meant I was able to get into two games this year, a Hail Caesar game and a Check Your Six! game. And thanks to a tip I received, I was able to make a few bucks by selling off some of the All Quite on the Martian Front products!
Hail Caesar - Rome tries to save the Fort from the Dacian Barbarians
For the morning session I jumped into Mike and Troy’s Hail Caesar game … Of course I immediately blundered my first command roll! But even with the bad start, my horde eventually started rolling forward, straight at the fort, and reached the banks of the creek after three turns. Casualties from ranged fire were directed onto just a couple of units and shooting from the bolt throwers proved relatively ineffective [my opponent missed a lot!], so the bulk of my force arrived intact at the walls.
The Horde assembles before launching themselves at the Fort
 My first attempt to storm the walls, saw the Romans hold (high casualties caused one of my units to break). So I attached my commander to one of my "elite" units and stormed around the flank of the fort. This side was only held by a small unit of archers and they were not able to keep the swarm of troops off the walls. As they spilled over the walls, they were soon joined by the rest of the horde and proceeded to destroy the forts garrison.
Roman Auxiliary overlooking the mass of barbarians.
A moment before the fall ... off in the distance the Roman relief column.
They were supposed to sack the camp and head out, but our holding force on the right flank had been completely overrun by Allied Roman cavalry. So the troops inside the fort thought it best to hold out in the captured fort for a bit! The game ended in a draw.
 
Herb ran two The Sword & The Flame games.

Chris's Dr. Evil Must Die! game using Osprey's Black Ops rule set.

A large game of Dead Man's Hand, Jerry, Doc and Crew hosted the game.

Bill's WW1 game - Miracle of the Marne.
After a Lunch break, I jumped into Ken's CY6! game ... flying a mix of BF-109's and BF-110's, mostly Green pilots, though had one Veteran. I was able to score a couple of damaging hits early on, but I was not able to achieve a single hit for the rest of the game! That said, I did manage to down a plane ... my own, as I ran into one of the own planes!
Seven Years War Austrians advance upon the Prussians.


Matt and Wes hosted a 15mm SYW game using Wes's Old Dessauer rules
Regimental Fire & Fury ACW game put on by Scott.

Modern Ops game ... Jerry and James ran the game.

After running a Puget Sound Indian War 1855-56 game, the crew from down South put on a WWII game.
There were several other games that I had no pictures of, in particular, Dale and Sven put on a very large game of All Quite on the Marian Front. Overall another successful Drumbeat and I even have had several conversations with two chaps already planning to host games for Drumbeat 2017!
 

Wednesday, December 30, 2015

Let me hear your battlecry! - part 3


My final post on building my force for Dux Britanniarum, any further post will be battle reports or campaign updates. Below is an overview of Sigeric's band of warriors now ready to plunder the riches of Britain. Chronicles note:  Alas Sigeric memory of his band may not match actual history (AKA what I actually roll up for Sigeric may be different than below!)


  Sigeric “Always Victorious” is the second son of Maganradus and has already established himself as a proven warrior with several victories over Frankish Foederati.
 
Though it is this success that has caused friction with his older brother and in turn put his life in danger!


His mother (Giselberga) pressed him to leave and strike out his own before something "terrible" happened to him. With the knowledge that his older brother will inherit his father's lands, it is an easy choice to flee danland.

He buy's himself and his small band passage on a ship to the British Isle in a quest to carve out lands for himself.

As always, Leofric “Friendly Blade” his trusty champion, accompanies him as he sets sails for the British lands with fourteen other Vikings.
 
They land at Iceni and soon travel through Mercia to Catuvellauni, as he has heard that there are plenty of warlords aspiring to take lands from the weak British lords.

At Catuvellauni, Ecbald, Hamrolf, and Leofric spread tales of Sigeric might of arms and it is not long before he comes to the attention of a Walord. Auduin must have seem something in Sigeric as he allows twenty two other raiders to join his band.

His warband is now large enough to begin raiding the British lands of their riches. With success he hopes his band will grow and allow him to become a warlord in his own right.


Except for his two trusted friends, Sigeric will keep his best warriors by his side. They will form the elite of his warband and will be counted upon to vanquish any resistance encountered. Adorned in their heavy mail, with blade and shield they should excel at this task.


Ecbald “The Bold” is Sigeric’s oldest friend, and he will lead the bulk of the other warriors. In particular, the brothers Forwin and Frotfird were placed under the watchful eye of Ecbald. While the two are excellent fighters, due in large part to their constant fighting between themselves, they need a strong commanding presence to keep them from “accidentally” killing one or the other!


Hamarolf “The Hammer” will command the other six warriors. They are the fittest and fastest of his warriors and Sigeric expects he will send The Hammer on numerous flanking attacks with these warriors. Dagaleich, Brandulf, Hroddag and Ganefard are the youngest warriors in the band and should test Hamarolf with their youthful agility.


Sigeric is also accompanied by four woodsmen with bows. While they are not much use in battle, they provide Sigeric with some scouts and hunters. The best Sigeric can expect of them in battle is to harass the enemy with their arrows.


Of the four, the boy Wulfstan "Stone Wolf" has some talent. Though he is a British slave (won by Sigeric while gambling at Iceni) he is an excellent shot with the bow.


The boy's British name was Teutorigos but he was aptly given the Danish name Wulfstan by his former master after he calmly faced and brought down a charging wolf.

However, his real value is his knowledge of the area and his mastery of the British language that Sigeric will utilize from the boy.
 
UPDATE
I have finished the Saxon mounted contingent ...

Wednesday, December 16, 2015

Austrian Cuirassier Regiment II

Long overdue but the second regiment of Austrian Cuirassiers is finished! I was able to finish up the unit in between some of my other projects.
BP Cavalry Regiment: 12 figures on four bases - 240mm wide by 50mm deep.


For some reason the white turned about better on this unit. I suspect it is because I am using a different can of Tudor "dip" on this regiment.


I also painted up a few more generals for the Austrians ... I now have plenty of Division and Brigade leaders for any Black Powder game using my Austrians.


Next up for Napoleonic's: I am leaning towards painting up four more French Battalions ... I have some very "old" Old Glory figures and think I'll just slam out a few battalions to bulk up the French basic's (currently only have 6 Bn's). Though I would really like to do so more Russian's! I'll let you know what wins out on my next post.

Tuesday, December 8, 2015

Let me hear your battlecry! - part 2

It has been two months since I last posted, but I was not idle during those weeks. I have for the most part finished all of the leaders and elite troops, as well as the normal warriors.

Nobles and Elite Warriors
I tried to layer on the paint to give some definition to the clothing, not sure it was worth the effort (aka time) but it does really make some colors stand out.

No shield transfers for these warriors.

Next up were the warriors for the warband. I was going to go hog wild on patterns, but after a couple of less than successful "designs" I decided to just paint plain colored cloth for the rest of the figures. It has been my experience, that once a figure is on the table, all the "fancy" work on the figure disappears.
I gave most of them spears, as another subtle difference between the armored and non-armored troops when playing the game.
Another Noble if needed
Speaking of shields, I unfortunately discovered that the small shield transfers for the gripping beast figures were to big to fit! So I ended up having to hand paint the shields. Some of them turned out good, some not so much, though as a bonus they all fit in with the painting style of the figure. I had about fifty to do at once, so after priming them, stuck them to "dull" tape to paint up ... this worked really well.
Extra Shields
I still have some archers and light cavalry to finish, which I hope to get to next week. The archers will painted just like the warriors, but might spend some extra time on the horsemen as I only will ever paint up four of them.

Primed and Ready for Paint
I have yet to fully decide on whether to "Dip" the figures or not. I am leaning toward dipping as I have been doing that to all my miniatures for years now. Though I do like how the color pops off the figures and know the dip will dull those colors down. I am also worried about the shields getting to much dip on them.  But I suspect once I have finished the skirmishers, I'll dip the whole batch of them in on go.

Then it will be on to basing ... which I have yet to decide on 20mm or 25mm rounds? I am leaning towards 25mm but several others seem inclined toward 20mm rounds. I suppose at the end of the day it won't matter much, though basing is kind of a pet peeve of mine.

In between painting the different class of Saxon warriors I have been finishing up a second unit of Austrian cuirassiers.
And while I am at it ... a few more Austrian generals as well.

I really need to get the above finished as there are several store projects piling up. Boromites for Beyond the Gates of Antares and US/USSR tanks for Team Yankee!

Tuesday, October 6, 2015

Let me hear your battlecry! - part 1

I finally received the Saxon figures from Gripping Beast last week and have started working on them. See a previous post on my latest project.

There was a little more clean up of the figures than I expected, especially as I had to clean up the hands to receive a weapon. But they are overall decent figures and am looking forward to getting them painted and on the gaming table.

I am starting with the leaders and elite troops ... the warband will need sixteen to start with, but have decided to paint up some extra's for potential upgrades throughout any campaign, so am painting twenty two.

As you can see I started with a quick application of silver on the chainmail and helmets. Except for the leader figure which I am going for gold armor. I'll add in the flesh next, then work on all the cloth. I am still debating on whether to paint the small shields or use shield transfers.
 
After the elite troops, I will work on the basic warriors ... another 24 figures. I plan on panting them in basic colors. Same for the archers which I'll do after the warrior figures. The last group I plan on doing is the four light cavalry figures ... not even sure the campaign will last long enough for them to be added to the warband, but it is only four figures so why not!