Showing posts with label Napoleonic. Show all posts

Thursday, February 11, 2021

Basing 28mm Napoleonic Figures


Recently I have been asked how I base up my rank-n-file 28mm Napoleonic figures, so instead of repeating myself the below is our groups basing scheme for rank and file napoleonics. About a decade ago, my gaming group came to a conesus for the below basing system and we have been using it since our heavy Black Powder gaming days. We now game General d'Armee and the basing has remained the same. The "system" was a compromise on aesthetics, cost and legacy basing for game systems like General de Brigade. For the most part we are all still pleased with the results this standard has given us, though I've noted a couple of alternative ideas that I might have used knowing what I know now! All the bases I use are from Litko and are the 3mm thick and at the end of the post, I summarize the bases used and the Litko code for each of them.

Infantry Battalion - 40mm Square Base
Each infantry battalion is comprised of twenty four figures, with four figures on each of the six 40mm square bases. I tend to have one command base with the flag(s), two "elite" company bases and three center company bases for almost all nations.

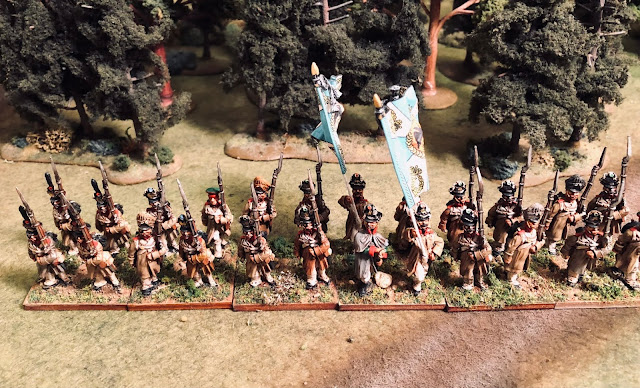


Alternate Basing - It can be time consuming moving six bases and if I had to do it again I might be open to using four bases of six figures instead. You can show most formations normally and it is slightly quickier moving four bases ithan six.

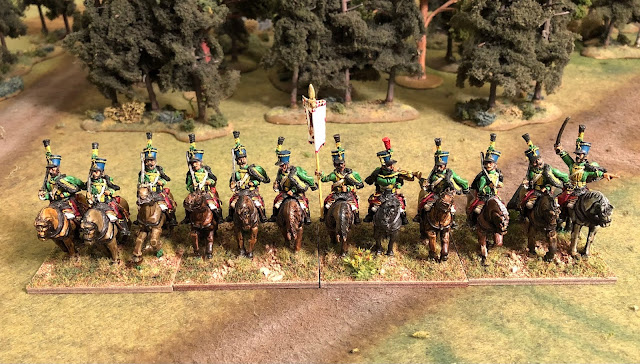
Cavalry Regiment - 50mm x 60mm Rectangle Base
We use twelve figures for each cavalry regiment, with three figures on each of the four 50mm deep by 60mm wide bases. It can be a tight squeeze sometimes but I have not had to adjust the base size to fit a brand of figures yet.


Artillery Battery - 60mm by 80mm Rectangle Base
An artillery battery is comprised of two gun models and eight to ten figures on three bases, one of which is a spacer base in between the two gun bases. A single gun and four crew are attached to a 60mm wide by 80mm deep base. For the spacer base, we use zero to three figures, extra equipment and large scenic items added to the same sized base, and is used to increase the width of a deployed battery.


Alternate Basing - well not really alternate base, but I have been thinking about making a left and right gun base and tighten each gun to the appropriate side, perhaps even moving a figure or two from the gun base to the spacer base. The idea is to get the guns a little closer together and add space to the "outside" of each battery. I might try this on the next battery I paint up.

Skirmish Screen - 30mm x 60mm Rectangle Base.
For brigade skirmish screens of two to nine bases, we use two figures on a 30mm deep by 60mm wide base. We also substitute four infantry bases with an equal number of skirmish screen bases to indicated that a light battalion has deployed into skirmish formation.


Alternate Basing - instead of a rectangle base I think I'd base my skirmishers on an oval base. I'd most likely use 35mm by 60mm oval bases (GMB731). The rectangle base seems to "orderly" for skirmishers and an oval base would look more "natural" when bending the skirmish line.

Brigade Leader - 60mm Round base.
Most brigadiers are represented by one mounted figure on a 60mm round base.


Division Leader - 3" Round Base
Divisional or higher level leaders typically have two or more figures on a 3" round base.


Casualties and Disorder Markers
To show if a unit is Disorder we use "wounded" figures mounted on 25mm or 30mm round bases. To mark casualties suffered during the games, we use a 40mm square with a dead figure or horse, with each side being marked from 1 to 4 to show the number of "hits" the unit has suffered.


Alternate Basing - Some of the guys have been using the micro dice holders on the causality bases. They typically use a double d6 "tray" so as to mark 1 to 12 hits per unit. I myself am not super keen on the dice, and have been thinking about making hit markers as above with out the figure and double sided and making a smaller 2nd set to mark hits 9 to 16. I'd also color code the hits number to show the effects of losses for General d'Armee.

Base Summery - Litko 3mm Wood Bases.
Below is the list of bases I use from Litko.

Type

Size

Litko Part #

Infantry

40mm x 40mm

GMB061

Cavalry

50mm x 60mm

GMB497

Artillery

60mm x 80mm

GMB081

Skirmish

30mm x 60mm

GMB073

Brigade Leader

60mm Round

GMB245

Division Leader

3” Round

GMB605


I hope some of you found this helpful.

Wednesday, July 1, 2020

Napoleonic Dutch Infantry Company, part 2

I have finally got around to posting part two of my French Allied force for Sharp Practice and I am happy to say it is done! I was even able to finish a gun for for the company so I can swap out one of the other units to add a little variety to the force or use it for larger games. I might go back and craft a few items, like fixing the commanders sword but the below figures are game ready.

3rd Company, 2nd Battalion of the 4th 'Dutch' Line Regiment. 

Up first is the main portion of the company commanded directly by Captain Reynst. The platoon of line soldiers are covered by a detachment from the battalions light company. In reserve, Captain Reynst has been given a small group of men from the battalions grenadier company. To help manage these men Sgt. Goosen paces the rear of the formation keeping the men motivated and in line.

Capt. Reynst (Lvl III)
Sgt. Goossen (Lvl I)
  "French" Line Infantry, 1809‐1812 (8 figures)
  "French Line Infantry, 1809‐1812 (8 figures)
  "
French" Grenadiers, 1809‐1812 (8 figures)
  "French" Voltigeur Skirmishers, 1809‐1812 (6 figures)

The second platoon of the company is commanded by Lieutenant Houtman and is of similar compositions as the first platoon sans the Grenadiers. Houtmans' platoon will support the captain typically to the left. That said it is not unheard of that the Captain will send the Lieutenants command on its own side mission.

Lt. Houtman (Lvl II)
  
"French" Line Infantry, 1809‐1812 (8 figures)
  "French Line Infantry, 1809‐1812 (8 figures)
 
  "French" Voltigeur Skirmishers, 1809‐1812 (6 figures)


Accompany 3rd company is a detachment of lancers from the corps cavalry brigade. The Westphalian Chevau-léger's were placed under the command of Lieutenant Trocke. He mostly acts as an liaison officer between Captain Reynst and Westphalians to insure they understands his orders, as he just happens to be the only one in the company that knows German fluently! Lt. Trocke is a decent horseman in his own right, and because of this the lancers have grown to respect the lieutenant and now trust him to lead them into the battle. 

Lt. Trocke (Lvl II)
  "French" Lancers to 1812 (8 figures)

In some situations a 6lb cannon and crew from Captains Trips 3rd Dutch Horse Artillery Battery is tasked to Captain Reynst company. Being horse gunners they typically deploy with the lancers and Lt. Trocke. As the guns crews are regularly rotated from the battery they lack familiarity with other solders of the company, so they tend to operate independently once combat commences.

"French" Medium Artillery (4 figures + 1 Cannon)


We usually play around 70 to 75 point games, and this force is 67 points without the gun and 74 points with the gun, so I generally have a few points to get support options as well.

This force of miniatures also breaks down well for our games of Napoleonic Rebels & Patriots, in particular when we play with our modifications. Even without the modifications, I painted a few extra figures so that the group sizes match to those in R&P.

As of now, I am leaning towards a Spanish force as my next SP2 project, but have to finish my Italian Alpini Chain of Command platoon and General d'Armee Russians before I start it.  

Monday, June 29, 2020

Battle of Gilly, 1815 Belgium

It goes without saying that gaming during the COVID-19 pandemic has been a difficult endeavor to accomplish these days. That said, our small group did get a game of General d'Armee in last Sunday (the day the store is closed). We played on the large 6' x 12' table which made it easier to social distance while gaming.

The scenario was inspired by the rearguard action on June 15th 1815 near the town of Gilly, between Pirch II division and Lefol’s division from Vandamme's III corps leading the french advance. While control of the town was helpful (cavalry and artillery could only cross here), the Prussian objective was to hold off the French for an unknown number of turns. The French needed to aggressively engage and disperse two of the Prussian brigades to claim victory.

The Prussian 28th Regiment awaits the assault of the French 37th Regiment.

Holding the village was our best regiment, the 6th Infantry Regiment.
Well behind the village, we put the Prussian 2nd Westphalian Landwehr Regiment in reserve.

The Prussian left was held by the Cavalry brigade comprised of the 2nd Dragoon regiment,
a Westphalian Landwehr Cavalry regiment and a 6lb horse battery.

The French right flank with the five battalion of 12th and 56th Ligne,
supported by the 1st & 4th Hussar Regiments and a 6lb Horse Battery.

The four battalions of the 37th and 64th Ligne attack on the French left.
Behind them is the Empress Dragoon Regiment of the Old Guard!

It is difficult to see but the five battalions of the 15th Léger and 23rd Ligne have begun their assault on the village held by 1st battalion of the 6th Prussian Regiment. The veteran fusilier battalion of the 6th Regiment was in support just to the rear of the village.

It should be noted that this was the point in the game that a major fight for the village started. The initial French assault ended in a draw, but both sides added more battalions to the fight before the Prussians had to retire...

The 6th regrouped and immediately counter attacked ... which once again led to a drawn combat. And again both sides threw more battalions into the fray, until the worn French had to retreat leaving the village once more in Prussian hands. The hour long fight involved nine battalions of infantry between both sides.

While 1st/37th Ligne was heavily mauled by the fighting in front of the stream,
the other French battalions were able to force back the battalions of the 28th Infantry Regiment.

Reduced, the remnants of the 28th regiment reform on the small rise with orders to stop the onslaught of the French ...
they failed and were dispersed from the battlefield!

Though it was at this moment that the Prussian high command felt the Major General Pirch II had delayed the French long enough and allowed his division to begin an orderly retreat from the battlefield claiming victory over the French.

All in all another good game of GdA, and we are already planning our next battle (La Rothiere 1814). We have played so many games now that we are starting to add in house rules to "fix" issues that crop up. For this game the terrain rules (very lacking in GdA) caused some grief and delays in the game, so we are looking at the terrain rules in General de Brigade and incorporating some of them into our GdA games.

Tuesday, May 28, 2019

Attack on the Pajar Vergara - Talavera July 28th 1809


We had not pulled out our Napoleonics figures in a long time, so this last weekend we decided to do a small game of General d'Armee. I had written up a scenario last year that we had not gamed yet and thought this would make for a small division sized battle. The scenario was built around General Leval's attack on the Pajar Vergara at the Battle of Talavera in 1809.

In the original French plan, Leval was to attack second, but his troops had to advance through the olive groves north of Talavera, and he soon lost sight of the rest of the French lines. Believing his advance had taken longer than it really had, Leval attacked early. Their order from left to right was as follows - Frankfurt, Hessen, Baden, Nassau and Holland. The nine battalions of the German Division were arrayed in a single line of battalion columns with a thick screen of skirmishers in their front. His columns had been broken up in the advance through the trees, and emerged into the open ground in front of the Allied lines in some disorder.

His right hand regiment was facing British troops, his left hand regiment Spanish troops and his central regiment the gun battery on Pajar de Vergara. For some time his left and right regiments made some progress, but then the central regiment broke under the impact of the artillery fire. Seeing this, the 7th, 40th and 53rd Regiments charged the French right, which broke and fled. Leval’s left was forced to retreat to avoid being isolated. The British captured six French guns, spiked them, and then returned to their lines. In a fight that had lasted 45 minutes, Leval had lost close to 700 men.


The Battle
The battalions of the ‘German’ division struggled to move out of the olive tree fields in an orderly fashion. And it was a battalion of Baden troops from the Brigadier Porbeck brigade in the center which formed up first. They tried to rush the Spanish heavy guns at the top of the Pajar Vergara … canister fire however drove them off and after a second attempt by the other Baden battalion failed, the Brigadier changed his tactics. He reinforced his brigade skirmish screen and set them in from the guns to slowly pick off the Spanish gunners.
The two Baden Battalions in front of the "ramp" to the Pajar Vergara
 While this was going on, Brigadier Grandjean two hessian battalions and a battalion from Frankfurt advanced on the French left towards the line held by the Spanish infantry. Some very indecisive action then occurred, but the French slowly but surely gained the upper hand.
The 2nd Attempt by the Baden regiment to take the redoubt.
The two battalions of Dutch infantry on the French right took the longest time getting out of the Olive groves, and once clear struggled to move forward under the flanking bombardment of the British battery on the Pajar Vergara. The fire was to much and this battalion dispersed, however it did buy time for the other battalion to engage the British Battalion of Detachments from Gen. Kemmis brigade. The veteran Dutchmen were able to rout off the battalion, before Gen. Kemmis could swing his other two battalions around.

Gen. Campbell 4th Division
With just one battalion holding his right flank, General Leval sent his only reserves, the Polish Brigade (temporarily attached), to shore up the gap between the center and right brigades. Gen. Potocki’s two large polish battalions launch an all-out assault on the remaining battalions of Col. Kemmis' brigade … and failed spectacularly!

Col. Kemmis brigade right before the Dutch attack them.

French Artillery fire finally started to takes its toll on the British and Spanish forces. In particular, General Portago Spanish division faltered and was close to routing before two provincial militia battalions arrived to stabilize the division.

General Portago Spanish Division after it has been pushed back across the Portina stream.
With the spanish gunners finally driven off by the large skirmish screen, General Porbeck sent his one remaining fresh battalion of Nassau infantry up the ramp and assaulted the British battery in the flank. The royal gunners fought valiantly but were routed off the Pajar Vergara.
1st Brigade marching to shore up the Spanish flank ... moments later they would turn around!

The Polish brigade rallied and move back into the french line, which was conforming to the Portina stream. This prompted General Campbell's two battalions of British Veterans to to turn around and march back to the British left to make sure a gap in the allied line could not be exploited. In fact, Brigadier General Campbell 1st brigade spent most of the battle counter marching back an forth between the left and right flanks during the battle, and in the end did not engage in any any combat except for skirmishing fire! Though reinforced the Spanish division was in poor shape as artillery fire and close range musketry was taking its toll on the spaniards.

 [After 5 hours of game play we ended the game at this point and called it a minor French victory.] With his right about to be compromised, Sir Wellesley ordered the Foot Guard brigade to attack the Germans trying to flank his position utop Medellín hill. This indeed put a halt to the German Divisions advance, but left the Medellin hill depleted and Gen Sebastiani 1st Division troops were able to push onto and hold Medllin Hill. This forced Wellesley to retire as his command was in jeopardy of being split into two parts.

Turned out to be a really good game and has inspired us to do another battle soon ... leaning towards Russians vs French and so perhaps an 1814 game.

Thursday, June 14, 2018

Napoleonic Dutch Infantry Company

I have decided to get back to some basic's, aka Napoleonics, for Sharps Practice. I decided to just use the lists out of the book, so peninsula war it is. I was not as keen on doing up French at this point, but we needed some "enemies" for the British, Portuguese and Spanish players, so French it was ... well kind of.

I would create up the list using the French stats, but paint the figures up as French Allies from Level's "German" division. This division was comprised of infantry from  Baden, Nassau, Dutch, Hessen-Darmstadt and the Confederation of the Rhine. After some consideration I settled on a company from the 2nd battalion, 4th Dutch Regiment.


Next I looked at the French list in SP2 and came up with this force as my starting point:

Capt. Reynst (Lvl III)
Sgt. Goossen (Lvl I)
  "French" Line Infantry (8 figures)
  "French" Line Infantry (8 figures)
  "French" Grenadiers (8 figures)
  "French" Voltigeurs Skirmishing (6 figures)

Lt. Houtman (Lvl II)
  "French" Line Infantry (8 figures)
  "French" Line Infantry (8 figures)
  "French" Voltigeurs Skirmishing (6 figures)

Lt. Trocke (Lvl I)
  "French" Lancers (8 figures) - from a Westphalian Chevau-léger Regiment

An interesting feature of the dutch uniform is that while it is basically a French uniform, the plume/tuft was on the side of the shako, instead of the front. I could not find a manufacturer who does a 28mm Dutch infantry figure. So I was left with using a proxy figure or relocating the plume/tuft of a French figure. I went the proxy direction and am using Elite Miniatures early French Legere figures which have side plumes on the shako.

The main "problem" with these figures is that they all have plumes. Which means they will work very well for the Grenadiers and Voltigeurs (I'll just square off the cuffs when painting them up). But I'm not sure if it is worth (or easy enough) to cut down the plume to a tuft for the Line infantry. Either way I am going to use the Elite figures, so I went ahead and ordered them now, as my main supplier does not keep stock of the early french and would have to order them from the UK.

He was able to send out the command pack that I am going to use for some leaders. So I decided to paint them up as the "test" figures. As the Dutch had white uniforms, I went with a grey primer then a highlight of white primer from above. Then used my large brush and applied an overbrush of white to each figure.

Capt. Reynst leading his fifty plus men through the perilous combat on the Iberian peninsula.

The 4th Regiment had rose/pink facings (2nd Regiment was blue), which I next applied to the collar, cuffs, turnbacks as well as all the plumes (tufts). Next was two and half tones of flesh, followed by the boots, scabbards and shako in black (well really dark grey).

Sgt. Goossen, the Captains right hand man.
He is a standard bearer normally, but I am thinking of adding a halbeard instead
Finally I painted on the few details on each figure and let them dry overnight. The next day I washed the whole figure with some thinned down Army Painter soft tone and called them done. I may go back and touched up some of the details.

Lt. Houtman ... with his broken sword!
The sword was broken in the package. I tried glueing the other piece to the end, but the first stress on it and it popped off. I am thinking now if I can get a right handed pistol "hand" I could chop the hand off and attach a new hand w/ pistol. 
I used my normal basing steps, but I think the basing turned out a little to "green" for Spain, so I am thinking of yellowing up the grass/bushes somewhat. Though as the games will be played on green table cloths not going to lighten it to much.

Right now I don't have a drummer in my force but if I decide to add one, he is already to go.
Hard to see but the drum rim is in the red, white blue of the dutch.

This was a simple paint scheme so I should be able to knock out the infantrymen in one fell swoop. So I am just waiting on the fifty plus figures to arrive ... then walla a SP force ready for actions sans the cavalry!


Thursday, March 1, 2018

Battle of Hanau 1813 - After Action Report

Last Saturday, Ralph Holoway put on a game of 4th edition Napoleon's Battle at the store. He took several pictures of the game and wrote up a report on how it went. I have re-posted his AAR with his permision below. 


The initial deployments were based off of historical deployments, the Bavarians (Ronald and Daine Oldman) to the north of the Kinzig, with their cavalry and the Raiding Force of Austrian and Cossack cavalry on the far left, and the Austrian corps and cavalry south of the Kinzig Stream.

The French (Jeroen Koopman and Gary Smith) were deployed in the Puppenwald and Lamboi woods initially shielded from Bavarian and Austrian artillery and musket fire.

The action started slowly in Turn 3 with the French infantry moving forward on their right in the Puppenwald and the 2nd Guard Cavalry moving out of the Puppenwald to the open terrain on the French right. The Bavarians began to engage the French in the Puppenwald with their artillery.

The Austrian commander then chose to begin the move of two brigades of his cavalry to the left flank to aid the Bavarian cavalry and the French received the 2nd Light Cavalry Division in the Puppenwald.

As the cavalry battle was joined between the Bavarian light cavalry and the Raiding Force, and the 2nd Guard Cavalry, this seemed less necessary. The allied cavalry soundly repulsed the Guard Cavalry (three consecutive rolls of 1 by the French).

On Turn 3 the French received he 4th light Cavalry Division deploying out of the Puppenwald to aid the French cavalry on the right.

The French infantry on the left flank in the Puppenwald moved to engage and combat the Bavarian left flank infantry vicinity Neuhof Farm on Turn 4. The Bavarians abandoned their guns during the onslaught.

Meanwhile on the French left in the Lamboi Woods, the French infantry had moved forward to engage the Bavarians south of Neuhof Farm. They were fired upon by some Austrian artillery south of the Kinzig Stream as well.

Between 12:30 hrs. and 1330 hrs. the 1st Old Guard Division, the 2nd Old Guard Division and Guard Artillery arrive arrived via road in the Lamboi Woods. The Guard moved forward to engage and combat the Bavarians and Austrians south of the Neuhof Farm.

On the French right, the cavalry battle continues with mixed results for the French. The Bavarian light cavalry is forced to withdraw, but Austrian cavalry arrived to reinforce the flank.

The game ended on Turn 8 or 13:30 hrs. after approximately five hours of play.

Conclusions I drew from the play of the scenario as written:

- Need to start battle later,11:00 hrs. versus 9:00 hrs. This will start that fight earlier in game play and give the French cavalry on the right two more light cavalry divisions for the cavalry fight on the right.

- Also, would probably preclude Austrian cavalry from south of Kinzig Stream affecting that fight. This is more historical in outcome, as the French cavalry threatened the Bavarian infantry after their defeat of the allied cavalry. Also, this would bring the main fight of the Old Guard to clear the north of the Kinzig Stream earlier in play.

- Need to give more depth to the French deployment area in the woods for Imperial Guard deployment.


Friday, November 10, 2017

Napoleonic Buildings - Plancenoit, Part Three

Finished! Well as done as I going to get them at this point :)
Northern Plancenoit - five BUA's sectors.
I won't be doing as many walls and hedges as planned, as the area to fit the troops in is already small and I don't necessarily need an entirely walled village. Fields and brush will be placed around the perimeter to break up the lines created by the built up areas.

Overall the village came out pretty well; though the "whole" looks a lot better than the individual buildings. But for what it is going to be used for, it is well past good enough!
The hedge at the end can be removed for another road opening.
Each BUA area is roughly a 9" square and I spray painted the road, dirt and grass areas on to a piece of felt. I'll most likely reverse the felt and spray a different pattern so that we can vary the village.
Time was the issue, so no door on the "city" gate. I can easily also one in at any point.
But thought the village needed a restricted entry/exit as well as an end cap. 

At the last minute I changed one of my buildings to a small church and went 'fancy' by adding color printouts to represent stained glass. It came out alright, but I think I need to figure out how to add a window frame.
The walled church area can be used for a particular difficult area to fight over.

When using the plastic stone facings, I need to be more precise with the cuts and do a better job of hiding the joins.

Need to frame that stained glass!
Most of the other buildings went as planned, though did add an inner gatehouse at the last minute.
Hard to see, but the Inner Gate is directly in the back.
As with all my projects, there are a things I would do differently. First and foremost is to make many of the buildings taller to give them illusion of being a 28mm building. As it is, several of the buildings would work well in a 15mm game :)
Some of the buildings are very small, the worst offender is seen above in the center.
I also used a homemade wash (really just gloried dirty water!), and not sure I like the look. Though I am warming up to it the more I put other terrain on the table. I suppose I should also do a better job of mixing the "ingredients" and perhaps add more brown to it to warm up the color some.
The wash used for the wall and buildings was different ... I tried to dry brush the walls to better match the buildings
The stone wall was much easier to do up than I thought, but next time I will spend more time blending the top and sides together. Kind of expensive using all that plastic, but thought I needed one BUA sector that could represent a fortified area. I had plans to do a wrought iron gate, but just felt it was not worth the time at this point, and I can always add it in later.
The gap is noticeable on the right side wall.
I watched a video by a "railroad guy" on how to do up hedges, and so set out to copy him. Turned out to be a very quick and easy way to turn those blue scrubbing pads into trimmed hedges! I am also thinking about making a gate section as well. Right now they are all unbased which means I'd need to sink the connecting popsicle stick into the bottom of the hedge, very doable just hard on the scissors :)
First layer drying ... then the bright stuff will be added.

Hedges complete, some bright green to make them pop on the gaming table.

The hedges are about 1" high and fit well with the 28mm figures.

I had issues with the new spackling I used. It seems that I was not paying attention and bought a different brand. Many of the buildings sides were much "smoother" than planned. It was also 'wetter' and so may not add as much water and paint next time.
The spackling turned out much smoother so I might add some sand next time.
I got tricky with the last BUA wall section. Instead of two corner sections I combined them with a small strip of cardstock. Pretty flimsy but the building notch in really well.
Notched out a section to fit the back building in between two wall sections.

Again think the village will work very well for our General d'Armee games, and we should have enough BUA's for most games were running now.

Back to miniatures for next project ... another unit of Russian Infantry in greatcoats.